
All photos are thumbnails for larger pics (not including Gif drawings)
This info shows how to make parallel wound tubes out of .002" Kapton sheet (from Jim Fackert), for 30mm FAI models. Making them for 40mm models, or any other diameter, is the same process (just different diameters require different sheet widths).
Tailcones are not made of Kapton. The heat of ejection and stiffness/strength required for a cone just is not suitable. So tailcones are best made out of fiberglass, or as a less desirable option, paper cones.
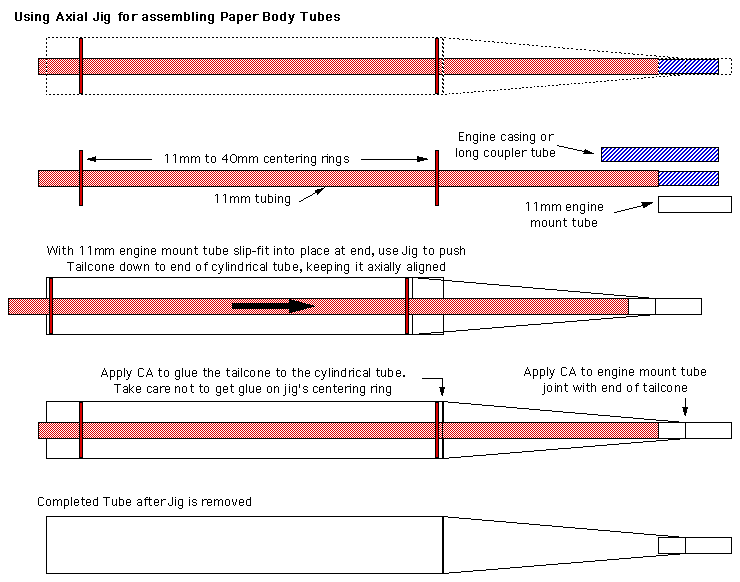
When the straight Kapton tube is done, it can be glued (using CA) to a tailcone using the method shown in the following GIF drawing for a jig for aligning and gluing 40mm bodies. If you have a "real" FAI body mandrel, that can be used instead. But be sure to keep the main tube and tailcone slide far enoghh down 1/2" to 1" so that you do nto accidentally get CA onto the mandrel itself.
All photos are thumbnails for larger pics (not including Gif drawings)
A suitable mandrel is needed for rolling the tube. For this example, the mandrel was some 30mm aluminum tubing from Andy Tomasch. That tubing is exactly 30mm O.D., assuring that the Kapton tube will make the FAI minimum diameter by some margin for measurement error. The tubing might have a little flaring-out or burring where it was cut, use some 100-150 grit sandpaper or even a Dremel tool with cut-off wheel to sand or grind the tube to de-burr it and give it a slight rounding. This way the completed tube will slide off of the mandrel more easily. This deburring step does not apply if using a custom made mandrel for making full FAI bodies.
Other special supplies needed are Scotch 1/2" double-sided tape, and a fine line marking pen as shown above (Both available from Wal-Mart or office supply stores).
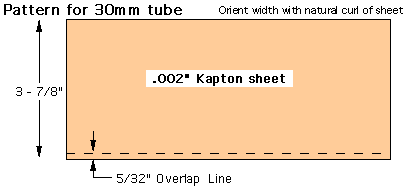
The Kapton sheet should be cut to 3-7/8" wide (orient it to go with the curl of the sheet), and as long as the desired length of the completed cylindrical tube. The width of 3-7/8" is about 5/52" wider than needed to wrap once around the mandrel. The extra 5/32" allows for enough overlap to join the sheet together with the double sided tape.


Use masking tape to tape the Kapton sheet down to a building board, curled-side-up, 5/32" marked overlap at the bottom. The board should be dust-free. Tape in 4 places as shown above, careful not to put tape over the two lower corners where the overlap is. Peel off a length of double sided tape longer than the length of the sheet, and moving from left to right carefully start to lay the double sided tape down across the drawn overlap line. Do not go above the line, as the adhesive in the tape might stick with the foam plug at ejection. If the tape does not go on right, you might be able to peel it up a bit and reposition it. But if you do it too much that you contaminate the adhesive of the tape, just throw away the tape and start over with a new strip. After getting the tape down properly, carefully run your finger across the tape to press it down all the way into place.

With the tape successfully applied, lay a straight edge or ruler down across at the bottom edge where the Kapton sheet ends, to act as a guide for cutting the tape off flush with the end of the Kapton sheet. After cutting the tape horizontally using the ruler, also make two vertical cuts at the left and right sides to trim off the rest of the tape along the 5/32" wide overlap area.

Pre-curl the sheet and hold it that way for awhile so it will curl around the mandrel more easily. Be careful not to contaminate the adhesive of the tape.

The mandrel should have a line drawn along it that is parallel to the length. This line will help in aligning the sheet so that the joint overlap will be parallel and now skewed. Orient the Kapton sheet so that the unmarked side is at the top of the mandrel, the marked side with tape coming around from the other side. Use masking tape to tautly hold the upper part of the sheet parallel to the mandrel, leaving some clearance for the overlap.

This is the trickiest step, joining the overlap without any significant slop in the resulting tube diameter. Carefully bring the taped edge of the sheet around towards the top edge of the sheet, while holding the sheet as tightly to the mandrel as possible. With practice, this step will go better. Concentrate on getting the middle part as tight as possible, and press the taped edge down only in the middle, leaving the rest unjoined for now. Then repeat that step concentrating on the left side, then the right side, pulling the sheet tight each time. The result ought to look like the above photo, where the tape is tacked down in three spots. If everything looks even and tight, then go ahead and run your finger across the overlap to make the rest of the tape press down and stick to the overlap.

Final result above, a completed tube, ready to remove the masking tape and slide off of the mandrel.
- End